And not to forget the games like Angry Birds and Subway Surfers. There is lot of
potential to make money once we get into Android development.
This is a quick start article for those who want to start development in Android.
The focus of the article is application development and not game development.
Who can do Android Development
Developers who know how to use XML and programming using object oriented language
like C++ or Microsoft C# and Java developers can feel at home.
What you need to start developing for Android
Android being open source, all development tools are available for free. Download
and install the following tools to start development in Android.
1. Android Development Tools (ADT)
Download link: http://developer.android.com/tools/sdk/eclipse-adt.html
ADT is a plugin for Eclipse IDE, Eclipse is again open source and free to download.
You don’t need to download Eclipse separately. ADT comes bundle with Eclipse,
just download ADT and follow the instructions to install.
2. Genymotion – The faster Android Emulator
Download link: http://www.genymotion.com/
ADT provides a simulator for testing Android applications. While development we’ve
two options for testing our applications:
1. Have the target Android device (smart phone or tablet) connected to the PC using
a USB cable (enable debugging option on in your device).
2. Use Android Emulator
Android default emulator is painfully slow, so it’s highly recommended to setup Genymotion
emulator.
3. SQLiteStudio
Download link: http://sqlitestudio.pl/
All applications need a database to store and retrieve information. Sooner or later
you are going to need a database for your app. Android supports SQLite, an open
source embedded database system. SQLiteStudio is a Database Manager where you
can create and manage database artefacts like tables & views.
Let’s start development
We’re going to create an Expense Tracker app for Android. It’s a simple application that lets the user manage their expense
list with details like Expense title, Amount & Paid.
Create SQLite database
We are going to create SQLite database file to be used in our application. Fire up
SQLiteStudio and do the following steps:
Select Databases -> Add database from the menu and create a database file called etdata.db3

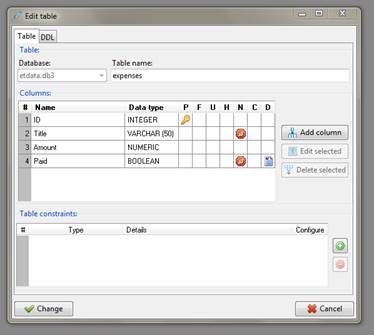
Create a table called expenses in etdata.db3 with ID, Title, Amount & Paid columns like the following image:
Double click on expenses table and use the Data tab to enter some sample data.

Save and close the database, we’ll use the data file soon in our application.
Creating Android Project
Open Eclipse and select File \ New \ Android Application Project
Type ExtenseTracker in Application Name leave the other options as it is (refer image below) and Click
Next

Keep Clicking Next (keeping the default values) until you reach Finish, click Finish to create the project.
Once project is created, you will see the project opened in Eclipse.

Take a close look at Package Explorer (you can open multiple projects at the same time)
The project folder ExpenseTracker consists of several sub folders including:
src – Stores all .java source code files
res – Stores all project resources like images, layout etc.
assets – Stores project assets like text, database etc.
In Android, a project is made up of Activities . An Activity is similar to web page, form or window. We create the layout of the activity using XML
and create the Activity class using java.
Be default, the project has created an activity (MainActivity.java) for us with a layout (activity_main.xml).
Right Click on the project and select Run As \ Android Application to run the project in emulator or the connected device.

Copy the database file etdata.db3 we created earlier into the assets folder

Open activity_main.xml file from res\layouts folder and select activity_main.xml tab to view the XML

Remove TextView tag completely and add the below XML:
<LinearLayout
android:layout_width="wrap_content"
android:layout_height="wrap_content"
android:orientation="vertical" >
<LinearLayout
android:layout_width="match_parent"
android:layout_height="wrap_content" >
<Button
android:id="@+id/btnNew"
android:layout_width="fill_parent"
android:layout_height="wrap_content"
android:text="New Expense" />
</LinearLayout>
<ListView
android:id="@+id/lvExpenses"
android:layout_width="fill_parent"
android:layout_height="fill_parent" >
</ListView>
</LinearLayout>
Select Graphical Layout tab, your screen should match the below image:

We’ve created two UI elements in this activity, Button for ‘New Expense’ and ListView for displaying list of expenses.
Create a new .java file in Src folder under com.example.expensestracker and add the following code:
package com.example.expensestracker;
import android.content.ContentValues;
import android.content.Context;
import android.database.Cursor;
import android.database.SQLException;
import android.database.sqlite.SQLiteDatabase;
import android.database.sqlite.SQLiteOpenHelper;
public class DBAdapter {
static final String TAG = "DBAdapter";
static final String DATABASE_NAME = "etdata.db3";
static final int DATABASE_VERSION = 1;
final Context context;
DatabaseHelper DBHelper;
SQLiteDatabase db;
public DBAdapter(Context ctx)
{
this.context = ctx;
DBHelper = new DatabaseHelper(context);
}
private static class DatabaseHelper extends SQLiteOpenHelper
{
DatabaseHelper(Context context)
{
super(context, DATABASE_NAME, null, DATABASE_VERSION);
}
@Override
public void onCreate(SQLiteDatabase db)
{
}
@Override
public void onUpgrade(SQLiteDatabase db, int oldVersion, int newVersion)
{
}
}
public DBAdapter open() throws SQLException
{
db = DBHelper.getWritableDatabase();
return this;
}
public void close()
{
DBHelper.close();
}
public Cursor getExpenses() throws SQLException
{
return getTableRows("SELECT * FROM expenses");
}
public Cursor getExpense(int id) throws SQLException
{
return getTableRows("SELECT * FROM expenses WHERE ID=" + id);
}
public Cursor getTableRows(String strQuery)
{
return db.rawQuery(strQuery, new String[] {});
}
public long insertExpense(String title, Integer amount, boolean paid)
{
ContentValues initialValues = new ContentValues();
initialValues.put("Title", title);
initialValues.put("Amount", amount);
initialValues.put("Paid", String.valueOf(paid));
db.beginTransaction();
long newId = db.insert("expenses", null, initialValues);
db.setTransactionSuccessful();
db.endTransaction();
return newId;
}
public boolean updateExpense(long rowId, String title, Integer amount, Boolean paid)
{
ContentValues updateValues = new ContentValues();
updateValues.put("Title", title);
updateValues.put("Amount", amount);
updateValues.put("Paid", paid);
db.beginTransaction();
boolean updated = db.update("expenses", updateValues, "ID="
+ rowId, null) > 0;
db.setTransactionSuccessful();
db.endTransaction();
return updated;
}
public boolean deleteExpense(long rowId)
{
boolean res = false;
res = db.delete("expenses", "ID=" + rowId, null) > 0;
return res;
}
}
This file contains all database operations and provides user friendly methods to
interact with the database like selectExpenses, insertExpense etc.
Open MainActivity.java from Src folder and replace the code with the below following:
package com.example.expensestracker;
import java.io.File;
import java.io.FileNotFoundException;
import java.io.FileOutputStream;
import java.io.IOException;
import java.io.InputStream;
import java.io.OutputStream;
import java.util.ArrayList;
import java.util.List;
import android.os.Bundle;
import android.app.Activity;
import android.content.Intent;
import android.database.Cursor;
import android.util.Log;
import android.view.LayoutInflater;
import android.view.Menu;
import android.view.View;
import android.view.ViewGroup;
import android.view.View.OnClickListener;
import android.widget.BaseAdapter;
import android.widget.Button;
import android.widget.CheckBox;
import android.widget.ImageView;
import android.widget.ListView;
import android.widget.TextView;
public class MainActivity extends Activity {
List<ExpenseType> lstExpense = new ArrayList<ExpenseType>();
ListView lvExpense;
@Override
protected void onCreate(Bundle savedInstanceState) {
super.onCreate(savedInstanceState);
setContentView(R.layout.activity_main);
//copy pre-populated sqlite db file to the app data folder
String destDir = "/data/data/" + getPackageName() + "/databases/";
String destPath = destDir + "etdata.db3";
File f = new File(destPath);
if (!f.exists()) {
//---make sure directory exists---
File directory = new File(destDir);
directory.mkdirs();
//---copy the db from the assets folder into the databases folder---
try {
CopyDB(getBaseContext().getAssets().open("etdata.db3"), new FileOutputStream(destPath));
}
catch (FileNotFoundException e) {
Log.i("ExpenseTracker", e.getMessage() + "-in openDataBase method");
}
catch (IOException e) {
Log.i("ExpenseTracker", e.getMessage() + "-in openDataBase method");
}
}
Button btnNew = (Button) findViewById(R.id.btnNew);
btnNew.setOnClickListener(new OnClickListener() {
@Override
public void onClick(View v) {
Intent i = new Intent("com.example.expensestracker.ExpenseAddActivity");
startActivity(i);
}
});
lvExpense = (ListView)findViewById(R.id.lvExpenses);
fillExpenses();
}
private void fillExpenses()
{
DBAdapter db = new DBAdapter(this);
Cursor cExpense = null;
db.open();
cExpense = db.getExpenses();
lstExpense.clear();
if (cExpense.moveToFirst())
{
do {
lstExpense.add(new ExpenseType(cExpense.getInt(0), cExpense.getString(1), cExpense.getInt(2),
Boolean.valueOf(cExpense.getString(3))));
}
while (cExpense.moveToNext());
}
db.close();
lvExpense = (ListView) findViewById(R.id.lvExpenses);
lvExpense.setAdapter(mExpenseAdapter);
}
public void CopyDB(InputStream inputStream, OutputStream outputStream) throws IOException
{
//---copy 1K bytes at a time---
byte[] buffer = new byte[1024];
int length;
while ((length = inputStream.read(buffer)) > 0) {
outputStream.write(buffer, 0, length);
}
inputStream.close();
outputStream.close();
}
private BaseAdapter mExpenseAdapter = new BaseAdapter() {
@Override
public int getCount() {
return lstExpense.size();
}
@Override
public Object getItem(int position) {
return null;
}
@Override
public long getItemId(int position) {
return 0;
}
@Override
public View getView(final int position, View convertView, ViewGroup parent) {
View retval = LayoutInflater.from(parent.getContext()).inflate(R.layout.expense_item_layout,
null);
TextView txtID = (TextView) retval.findViewById(R.id.txtID);
TextView txtTitle = (TextView) retval.findViewById(R.id.txtTitle);
TextView txtAmount = (TextView) retval.findViewById(R.id.txtAmount);
CheckBox chkPaid = (CheckBox) retval.findViewById(R.id.chkPaid);
ImageView imgRemove = (ImageView) retval.findViewById(R.id.imgRemove);
imgRemove.setOnClickListener(new OnClickListener() {
@Override
public void onClick(View v) {
removeExpense (position);
}
});
txtID.setText(lstExpense.get(position).ID.toString());
txtTitle.setText(lstExpense.get(position).Title);
txtAmount.setText("$" + lstExpense.get(position).Amount.toString());
chkPaid.setChecked(lstExpense.get(position).Paid);
return retval;
}
};
private void removeExpense(int position)
{
DBAdapter db = new DBAdapter(this);
db.open();
if (db.deleteExpense(lstExpense.get(position).ID))
fillExpenses();
db.close();
}
@Override
public boolean onCreateOptionsMenu(Menu menu) {
// Inflate the menu; this adds items to the action bar if it is present.
getMenuInflater().inflate(R.menu.main, menu);
return true;
}
}
In OnCreate event of the activity we are doing the following:
1. Copy the database file to the data folder
2. Add Click event to ‘New Expense’ button and call ExpenseAddActivity activity that consists of layout (expense_add.xml) to add new expense items. We’ll create the activity and layout files soon.
3. Call and create fillExpenses() function that interacts with the database and iterate expenses table to fill the List with expense items, we’ll create ExpenseType class to map with the expenses table records, and finally we connect the ListView lvExpense to the adapter mExpenseAdapter that we will create later.
4. Create CopyDB function that copy the database file
5. Create mExpenseAdapter based in BaseAdapter that is one way of connecting to the ListView control with collection or array objects.
Create ExpenseType.java file in Src folder with the following code:
package com.example.expensestracker;
public final class ExpenseType
{
public Integer ID;
public String Title;
public Integer Amount;
public Boolean Paid;
public ExpenseType(int id, String title, int amount, Boolean paid)
{
ID = id;
Title = title;
Amount = amount;
Paid = paid;
}
}
Create ExpenseAddActivity.java with the following code:
package com.example.expensestracker;
import android.os.Bundle;
import android.app.Activity;
import android.content.Intent;
import android.view.Menu;
import android.view.View;
import android.view.View.OnClickListener;
import android.widget.Button;
import android.widget.CheckBox;
import android.widget.EditText;
import android.widget.Toast;
public class ExpenseAddActivity extends Activity {
@Override
protected void onCreate(Bundle savedInstanceState) {
super.onCreate(savedInstanceState);
setContentView(R.layout.expense_add);
Button btnSave = (Button) findViewById(R.id.btnSave);
Button btnCancel = (Button) findViewById(R.id.btnCancel);
btnSave.setOnClickListener(new OnClickListener() {
@Override
public void onClick(View v) {
EditText txtTitle = (EditText) findViewById(R.id.txtTitle);
EditText txtAmount = (EditText) findViewById(R.id.txtAmount);
CheckBox chkPaid = (CheckBox) findViewById(R.id.chkPaid);
if (txtTitle.getText().toString().trim().length() == 0) {
Toast.makeText(getApplicationContext(), "EXPENSE TITLE is missing.", Toast.LENGTH_SHORT).show();
return;
}
if (txtAmount.getText().toString().trim().length() == 0) {
Toast.makeText(getApplicationContext(), "AMOUNT is missing.", Toast.LENGTH_SHORT).show();
return;
}
DBAdapter db = new DBAdapter(getApplicationContext());
db.open();
db.insertExpense(txtTitle.getText().toString(), Integer.valueOf(txtAmount.getText().toString()), chkPaid.isChecked());
Intent i = new Intent(getApplicationContext(), MainActivity.class);
startActivity(i);
}
});
btnCancel.setOnClickListener(new OnClickListener() {
@Override
public void onClick(View v) {
Intent i = new Intent(getApplicationContext(), MainActivity.class);
startActivity(i);
}
});
}
@Override
public boolean onCreateOptionsMenu(Menu menu) {
// Inflate the menu; this adds items to the action bar if it is present.
getMenuInflater().inflate(R.menu.main, menu);
return true;
}
}
This activity uses the expense_add.xml layout file and calls the insertExpense method of DBAdapter and returns to the MainActivity.
Create expense_add.xml in res\layouts folder and add the following tags:
<RelativeLayout xmlns:android="http://schemas.android.com/apk/res/android"
xmlns:tools="http://schemas.android.com/tools"
android:layout_width="match_parent"
android:layout_height="match_parent"
android:paddingBottom="@dimen/activity_vertical_margin"
android:paddingLeft="@dimen/activity_horizontal_margin"
android:paddingRight="@dimen/activity_horizontal_margin"
android:paddingTop="@dimen/activity_vertical_margin"
tools:context=".MainActivity" >
<LinearLayout
android:layout_width="fill_parent"
android:layout_height="wrap_content"
android:orientation="vertical" >
<TextView
android:id="@+id/textView1"
android:layout_width="wrap_content"
android:layout_height="wrap_content"
android:text="Expense Title" />
<EditText
android:id="@+id/txtTitle"
android:layout_width="match_parent"
android:layout_height="wrap_content"
android:ems="10" >
<requestFocus />
</EditText>
<TextView
android:id="@+id/TextView01"
android:layout_width="wrap_content"
android:layout_height="wrap_content"
android:text="Amount" />
<EditText
android:id="@+id/txtAmount"
android:layout_width="match_parent"
android:layout_height="wrap_content"
android:ems="10" />
<CheckBox
android:id="@+id/chkPaid"
android:layout_width="wrap_content"
android:layout_height="wrap_content"
android:text="Paid" />
<LinearLayout
android:layout_width="match_parent"
android:layout_height="wrap_content" >
<Button
android:id="@+id/btnCancel"
android:layout_width="wrap_content"
android:layout_height="wrap_content"
android:text="Cancel" />
<Button
android:id="@+id/btnSave"
android:layout_width="fill_parent"
android:layout_height="wrap_content"
android:text="Save" />
</LinearLayout>
</LinearLayout>
</RelativeLayout>
This layout file consists of UI for adding new expense items.

Open AndroidManifest.xml file and add the following content:
<?xml version="1.0" encoding="utf-8"?>
<manifest xmlns:android="http://schemas.android.com/apk/res/android"
package="com.example.expensestracker"
android:versionCode="1"
android:versionName="1.0" >
<uses-sdk
android:minSdkVersion="8"
android:targetSdkVersion="18" />
<application
android:allowBackup="true"
android:icon="@drawable/ic_launcher"
android:label="@string/app_name"
android:theme="@style/AppTheme" >
<activity
android:name="com.example.expensestracker.MainActivity"
android:label="@string/app_name" >
<intent-filter>
<action android:name="android.intent.action.MAIN" />
<category android:name="android.intent.category.LAUNCHER" />
</intent-filter>
</activity>
<activity
android:name=".ExpenseAddActivity"
android:label="@string/app_name" >
<intent-filter>
<action android:name="com.example.expensestracker.ExpenseAddActivity" />
<category android:name="android.intent.category.DEFAULT" />
</intent-filter>
</activity>
</application>
</manifest>
We need to add the ExpenseAddActivity activity to AndroidManifest.xml file to be able to call the activity from MainActivity.
Create expense_item_layout.xml in res\layouts folder and add the following tags:
<?xml version="1.0" encoding="utf-8"?>
<FrameLayout xmlns:android="http://schemas.android.com/apk/res/android"
android:layout_width="fill_parent"
android:layout_height="wrap_content"
android:clickable="true"
android:focusableInTouchMode="true"
android:longClickable="true"
android:onClick="onClickCaseTypeCard" >
<LinearLayout
android:layout_width="fill_parent"
android:layout_height="fill_parent"
android:layout_margin="4dp"
>
<LinearLayout
android:layout_width="fill_parent"
android:layout_height="wrap_content"
android:layout_margin="1dp"
android:background="#fff"
android:orientation="horizontal" >
<LinearLayout
android:layout_width="wrap_content"
android:layout_height="wrap_content"
android:layout_weight="1"
android:orientation="vertical" >
<TextView
android:id="@+id/txtID"
android:layout_width="fill_parent"
android:layout_height="wrap_content"
android:gravity="left"
android:text="1"
android:textSize="15sp"
android:visibility="gone" />
<LinearLayout
android:layout_width="fill_parent"
android:layout_height="wrap_content"
android:layout_marginLeft="4dp"
android:layout_marginTop="4dp"
>
<TextView
android:id="@+id/txtTitle"
android:layout_width="wrap_content"
android:layout_height="fill_parent"
android:layout_margin="1dp"
android:layout_weight="1"
android:background="#ffffff"
android:gravity="left"
android:lines="1"
android:maxLines="1"
android:text="Title"
android:textSize="15sp"
android:textStyle="bold" />
</LinearLayout>
<LinearLayout
android:layout_width="fill_parent"
android:layout_height="wrap_content"
android:layout_marginLeft="4dp"
android:layout_marginTop="4dp"
android:gravity="center_horizontal"
android:orientation="horizontal"
android:padding="1dp" >
<TextView
android:id="@+id/txtAmount"
android:layout_width="wrap_content"
android:layout_height="wrap_content"
android:background="#ffffff"
android:gravity="left"
android:lines="1"
android:maxLines="1"
android:paddingLeft="4dp"
android:paddingRight="4dp"
android:text="Amount"
android:textSize="15sp" />
<CheckBox
android:id="@+id/chkPaid"
android:layout_width="fill_parent"
android:layout_height="wrap_content"
android:gravity="center_vertical"
android:text="Paid" />
</LinearLayout>
</LinearLayout>
<ImageView
android:id="@+id/imgRemove"
android:layout_width="32dp"
android:layout_height="32dp"
android:src="@drawable/i00cancel" />
</LinearLayout>
</LinearLayout>
</FrameLayout>
This layout file is used to render expense items in ListView.

THAT’S IT…
Run the project in emulator or connected device to see the result. Use ‘New Expense’
to add new expense item.
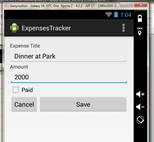
Press Save to add the new expense to the expense list

Summary
In this article we managed to create a complete app for expense tracking. We have
not got deep into each and every step of the code but the code being simple and
easy to understand, the same framework can be used to create more complex business
applications. It all boils down to layout files with UI widgets (Textbox, Buttons
and List controls) and Activities (Java files) that are similar to web pages.