1) Options Menu:
a) Create menu .xml file and must be located in a menu folder under resources and
the menu items are as below.
<menu xmlns:android="http://schemas.android.com/apk/res/android" >
<item
android:id="@+id/action_sync"
android:title="Sync"
android:showAsAction="ifRoom"
android:icon="@drawable/ic_navigation_refresh" />
<item
android:id="@+id/action_overflow"
android:title="Sliding Menu"
android:showAsAction="ifRoom"
android:icon="@drawable/action_overflow"/>
<item
android:id="@+id/action_slide"
android:title="Popup Menu"
android:showAsAction="ifRoom"
android:icon="@drawable/action_menu"/>
</menu>
b) OnCreateOptionsMenu function is available in Activity, override this method and
associate the menu.xml to MenuInflater as below.
public override bool OnCreateOptionsMenu(IMenu menu)
{
MenuInflater.Inflate(Resource.Menu.main, menu);
return true;
}
c) The next setup is implementing the method that will fire when one of the options
of the menu is clicked. That is done by overriding the OnOptionsItemSelected.
public override bool OnOptionsItemSelected(IMenuItem item)
{
switch (item.ItemId)
{
case Resource.Id.action_sync:
return true;
case Resource.Id.action_overflow:
this.FirstViewModel.NavigateToPopup();
return true;
case Resource.Id.action_slide:
this.FirstViewModel.NavigateToPopup();
return true;
default:
return base.OnOptionsItemSelected(item);
}
}
In above function, respective viewmodel methods are being called when each menu item
gets selected.
2) Popup Menu:
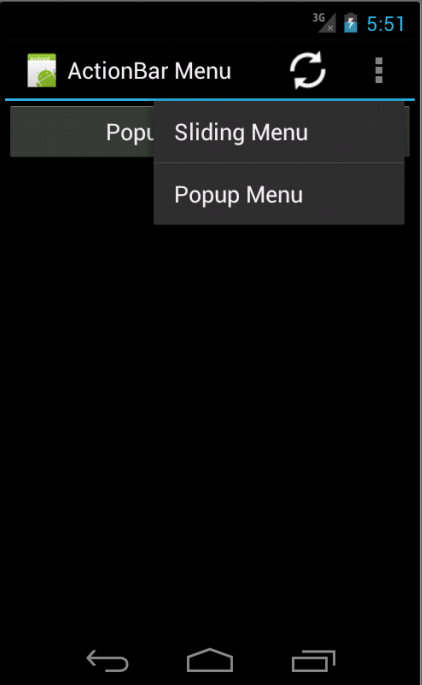
When you create the options menu as explained above and actionbar does not accommodate
with all the menu item icons, then you see overflow image in Actionbar, when
clicks on overflow image, menu will be opened as popup as shown in below image.
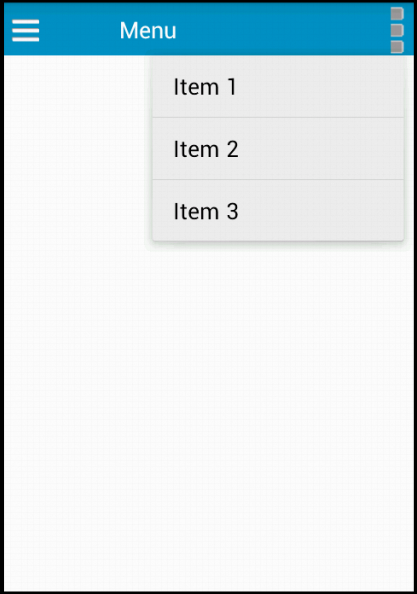
When you are implementing a Custom ActionBar where you want to implement the Popup
menu, follow below steps.
a) Create menu.xml file as explained in section 1.
b) Create Custom Actionbar layout in .axml file and place the overflow image button
<FrameLayout
android:layout_width="fill_parent"
android:layout_height="wrap_content"
android:id="@+id/frameLayout1"
android:background="@color/app_actionbar_background_color">
<RelativeLayout
android:orientation="horizontal"
android:layout_width="fill_parent"
android:layout_height="40dp"
android:id="@+id/linearLayout1">
<View
android:background="@drawable/action_menu"
android:layout_width="30dp"
android:layout_height="40dp"
android:id="@+id/MenuButton"
android:layout_margin="2dp" />
<TextView
android:text="Menu"
android:textAppearance="?android:attr/textAppearanceMedium"
android:layout_width="wrap_content"
android:layout_height="fill_parent"
android:id="@+id/txtHomeTitle"
android:gravity="center"
android:textColor="@color/app_title_background_color"
android:layout_marginLeft="90dp" />
<ImageButton
android:src="@drawable/action_overflow"
android:layout_width="wrap_content"
android:layout_height="fill_parent"
android:id="@+id/imgpopupMenu"
android:gravity="right"
android:background="@color/app_actionbar_background_color"
android:layout_alignParentRight="true" />
</RelativeLayout>
c) OnCreate function of activity find the imagebutton, associate the menu.xml to
PopupMenu and open the PopupMenu when clicks on imagebutton as below.
var imgpopupMenu = FindViewById<ImageButton>(Resource.Id.imgpopupMenu);
//Popup Menu
imgpopupMenu.Click += (s, arg) =>
{
PopupMenu popupMenu = new PopupMenu(this, imgpopupMenu);
popupMenu.Inflate(Resource.Menu.popup);
//popupMenu.MenuItemClick += popupMenu_MenuItemClick;
popupMenu.Show();
};
d) Refer the below screenshot for custom actionbar with Popupmenu.
3) Sliding Menu:
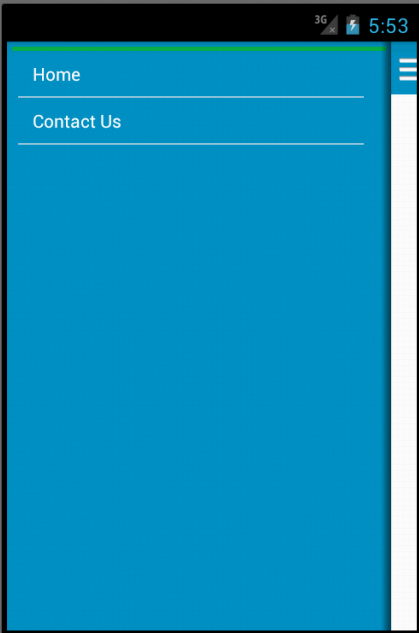
The idea is to put the navigation menu of your application in an initially hidden
drawer that can be revealed by a button click or a horizontal swipe as shown
in below screenshot.
In this case, menu is implemented as FrameLayout containing two items, the Menu view
and Content View. This FrameLayout is responsible for showing the menu.
a) This is the skeleton of our main activity layout:
<Menus.Droid.Views.FlyOutContainer xmlns:android="http://schemas.android.com/apk/res/android"
android:layout_width="fill_parent"
android:layout_height="fill_parent"
android:id="@+id/FlyOutContainer">
<include
layout="@menu/MenuLayout" />
<include
layout="@layout/ContentLayout" />
</Menus.Droid.Views.FlyOutContainer>
From above, outer layout is a custom FlyoutContainer class created to handle the
two views, one for menu which ID will be FlyoutMenu and one for the Content view
which ID will be FlyoutContent.
Sample Menu Layout is created with ID FlyoutMenu as below.
<LinearLayout xmlns:android="http://schemas.android.com/apk/res/android"
xmlns:local="http://schemas.android.com/apk/res-auto"
android:orientation="vertical"
android:layout_width="300dp"
android:layout_height="fill_parent"
android:background="@color/app_actionbar_background_color"
android:id="@+id/FlyOutMenu"
android:padding="4dp">
<View
android:layout_width="fill_parent"
android:background="@color/sub_section_item_divider_color"
android:layout_height="3dp"/>
<LinearLayout
android:orientation="horizontal"
android:minWidth="25px"
android:minHeight="25px"
android:layout_width="fill_parent"
android:layout_height="wrap_content"
android:layout_margin="8dp">
<TextView
android:text="Home"
android:textAppearance="?android:attr/textAppearanceSmall"
android:layout_width="wrap_content"
android:layout_height="wrap_content"
android:linksClickable="true"
android:clickable="true"
android:cursorVisible="true"
android:id="@+id/txtHome"
android:layout_gravity="center"
android:layout_marginLeft="8dp"
android:textColor="@color/app_title_background_color"
/>
</LinearLayout>
<View
android:layout_width="fill_parent"
android:layout_height="1dp"
android:background="#abe4e4e4"
android:layout_gravity="center"
android:layout_marginLeft="8dp"
android:layout_marginRight="14dp" />
</LinearLayout>
Sample Content Layout with Custom ActionBar in Frame Layout and Content view with
ID as FlyoutContent as below.
<LinearLayout xmlns:android="http://schemas.android.com/apk/res/android"
xmlns:local="http://schemas.android.com/apk/res-auto"
android:orientation="vertical"
android:layout_width="fill_parent"
android:id="@+id/FlyOutContent"
android:layout_height="fill_parent"
android:background="@color/app_title_background_color">
<View
android:layout_width="fill_parent"
android:layout_height="1dp"
android:id="@+id/view1"
android:background="@color/app_actionbar_background_color" />
<!--Custom Action Bar-->
<FrameLayout
android:layout_width="fill_parent"
android:layout_height="wrap_content"
android:id="@+id/frameLayout1"
android:background="@color/app_actionbar_background_color">
<RelativeLayout
android:orientation="horizontal"
android:layout_width="fill_parent"
android:layout_height="40dp"
android:id="@+id/linearLayout1">
<View
android:background="@drawable/action_menu"
android:layout_width="30dp"
android:layout_height="40dp"
android:id="@+id/MenuButton"
android:layout_margin="2dp" />
<TextView
android:text="Menu"
android:textAppearance="?android:attr/textAppearanceMedium"
android:layout_width="wrap_content"
android:layout_height="fill_parent"
android:id="@+id/txtHomeTitle"
android:gravity="center"
android:textColor="@color/app_title_background_color"
android:layout_marginLeft="90dp" />
<ImageButton
android:src="@drawable/action_overflow"
android:layout_width="wrap_content"
android:layout_height="fill_parent"
android:id="@+id/imgpopupMenu"
android:gravity="right"
android:background="@color/app_actionbar_background_color"
android:layout_alignParentRight="true" />
</RelativeLayout>
</FrameLayout>
<View
android:layout_width="fill_parent"
android:layout_height="1dp"
android:id="@+id/view2" />
<!--Content/body of the view-->
</LinearLayout>
b) In OnCreate method of Activity, write piece of code to open the sliding navigational
menu.
var menu = FindViewById<FlyOutContainer>(Resource.Id.FlyOutContainer);
var menuButton = FindViewById(Resource.Id.MenuButton);
menuButton.Click += (sender, e) =>
{
menu.AnimatedOpened = !menu.AnimatedOpened;
};
Please download the working sample from below link.
https://www.nullskull.com/FileUpload/-407123783_Menus.zip