The Code
I’ve created a Windows application with three buttons to keep this simple.
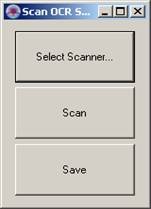
- Select Scanner – Allows you to choose a scanning device on your local machine.
- Scan – Initiates the scanning process.
- Save – Saves the results of the scanned images after having been OCR’d.
Under the hood, the LEADTOOLS .NET classes perform the bulk of the
work. We’ll walk through the code in the order that it’s executed,
starting with the form load event.
 Collapse
private void MainFrm_Load(object sender, EventArgs e)
{
RasterSupport.Unlock(RasterSupportType.Document, "");
RasterSupport.Unlock(RasterSupportType.Ocr, "");
RasterSupport.Unlock(RasterSupportType.OcrPdfOutput, "");
_twSession = new TwainSession();
_OCR = RasterDocumentEngine.Instance;
_Deskew = new DeskewCommand();
_Despeckle = new DespeckleCommand();
_HoleRemove = new HolePunchRemoveCommand();
_BorderRemove = new BorderRemoveCommand();
_LineRemove = new LineRemoveCommand();
_SmoothCharacters = new SmoothCommand();
_InvertText = new InvertedTextCommand();
_twSession.Startup(this, "LEAD Technologies, Inc", "Tutorials",
"1.0.0.0", "ScanOCRSavePDF", TwainStartupFlags.None);
_twSession.AcquirePage += new EventHandler(_twSession_AcquirePage);
_OCR.Startup();
_OCR.RecognitionDataFileName = Environment.GetEnvironmentVariable("TEMP") +
"\\ocrRdf.rdf";
RasterDocumentResultOptions opts = _OCR.SaveResultOptions;
opts.Format = RasterDocumentFormatType.PdfImageOnText;
opts.FormatLevel = RasterDocumentFormatLevel.Full;
_OCR.SaveResultOptions = opts;
_Deskew.FillColor = new RasterColor(Color.White);
_Deskew.Flags = DeskewCommandFlags.DeskewImage |
DeskewCommandFlags.DocumentAndPictures | DeskewCommandFlags.RotateBicubic;
_HoleRemove.Flags = HolePunchRemoveCommandFlags.UseCount |
HolePunchRemoveCommandFlags.UseLocation |
HolePunchRemoveCommandFlags.UseDpi;
_HoleRemove.Location = HolePunchRemoveCommandLocation.Left;
_HoleRemove.MaximumHoleCount = 5;
_HoleRemove.MinimumHoleCount = 2;
_InvertText.Flags = InvertedTextCommandFlags.UseDpi;
_InvertText.MinimumInvertWidth = 6000;
_InvertText.MinimumInvertHeight = 186;
_InvertText.MaximumBlackPercent = 95;
_InvertText.MinimumBlackPercent = 75;
_BorderRemove.Border = BorderRemoveBorderFlags.All;
_BorderRemove.Percent = 20;
_BorderRemove.WhiteNoiseLength = 9;
_BorderRemove.Variance = 3;
_LineRemove.Flags = LineRemoveCommandFlags.UseGap |
LineRemoveCommandFlags.UseVariance;
_LineRemove.GapLength = 2;
_LineRemove.MaximumLineWidth = 8;
_LineRemove.MaximumWallPercent = 10;
_LineRemove.MinimumLineLength = 200;
_LineRemove.Variance = 2;
_LineRemove.Wall = 14;
_SmoothCharacters.Flags = SmoothCommandFlags.None;
_SmoothCharacters.Length = 1;
}
I first unlock the support for some of the Document Imaging Suite
features. These functions only have to be called once (typically in a
startup routine) and the features they unlock are then available for
the life of the process. If you are using the LEADTOOLS evaluation, you
do not have to call these functions, as all functionality is available.
Next we create each object. The OCR object (RasterDocumentEngine) and the scanning object (TwainSession)
are created globally, as we’ll need them in multiple functions. The
rest of the objects are used to clean the images as they are scanned
into the application. They are created globally to avoid having to
create and destroy them over and over for each page scanned.
For both the scanning object and OCR object, you must call the StartUp function before you can begin using them.
I link a function to the AcquirePage event in the scanning object. This event is called for each page captured by the scanner.
In this sample, we are saving out the text that the OCR object has
generated from the images (recognized text) as a searchable PDF (PDF
Image with text underneath). We also set the RecognitionDataFileName to a file in the user’s temp
directory. This file is used by the OCR engine to store the recognized
text before it is converted to a final format, such as Microsoft Word,
Excel, PDF, etc. Each time you OCR an image, it appends the recognized
text to this file. This would allow you to append multiple documents
together even if you restart your machine in between scans. To opt out
of this option, simply delete this file prior to starting the
recognition process.
Each document clean object is then initialized to values that are optimal for most scanned bitonal images.
private void btnSelectScanner_Click(object sender, EventArgs e)
      {
         _twSession.SelectSource(string.Empty);
      }
In the btnSelectScanner_Click event, simply call TwainSession::SelectSource with an empty string to display the SelectSource dialog. This dialog is populated by the Twain Source Manager found in the twain32.dll file.
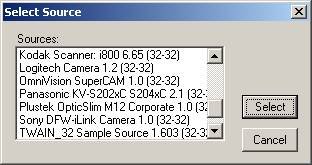
If you would like to select a scanning device without showing this
dialog, simply pass the name of the device for the parameter in the SelectSource function.
Before we begin the scan, you'll want to set up the scanner to
produce images that are optimal for OCR. We set the X and Y resolution
to 300 and set the bits per pixel to one, which essentially tells the
scanning device to scan in black and white.
Next, _twSession.Acquire begins the scanning process.
In this sample, we passed "None" as a parameter, which means that no
other user interface will appear before the scanner begins capturing.
You can also pass "Show" to show the scanner’s dialog, which will allow
the user to have the final say on the settings used.
Here is the code that does what was just described:
Collapse private void btnScan_Click(object sender, EventArgs e)
{
try
{
this.Cursor = Cursors.WaitCursor;
_twSession.Resolution = new SizeF(300.0f, 300.0f);
_twSession.ImageBitsPerPixel = 1;
_twSession.Acquire(TwainUserInterfaceFlags.None);
Console.WriteLine("AutoOrientPage");
for (int i = 0; i < _OCR.PageCount; i++)
{
_OCR.AutoOrientPage(i);
}
if (System.IO.File.Exists(_OCR.RecognitionDataFileName))
System.IO.File.Delete(_OCR.RecognitionDataFileName);
Console.WriteLine("Recognize");
_OCR.Recognize(0, _OCR.PageCount, null);
}
catch (Exception ex)
{
MessageBox.Show(ex.Message);
}
finally
{
this.Cursor = Cursors.Arrow;
}
}
At this point, the images are being scanned and the AcquirePage event is being called for each page scanned. This event is covered further down. Once the scan is complete, we call AutoOrientPage
for each page in the OCR. If a page was scanned up-side-down, this
function will rotate it back to right-side-up. Next, we delete the
recognition data file if it exists and then recognize all of the pages.
The _twSession_AcquirePage event is called for each page that is scanned. The scanned image is given to you in the TwainAcquirePageEventArgs::Image
parameter. In this event, we clean up the image using each of the
document clean-up classes created and set up in the form load event.
Once the image is clean, we add it to the OCR object where it is later
converted to editable text and stored in the recognition data file.
Collapse void _twSession_AcquirePage(object sender, TwainAcquirePageEventArgs e)
{
_Deskew.Run(e.Image);
_Despeckle.Run(e.Image);
_HoleRemove.Run(e.Image);
_InvertText.Run(e.Image);
_BorderRemove.Run(e.Image);
_LineRemove.Type = LineRemoveCommandType.Vertical;
_LineRemove.Run(e.Image);
_LineRemove.Type = LineRemoveCommandType.Horizontal;
_LineRemove.Run(e.Image);
_SmoothCharacters.Run(e.Image);
_OCR.AddPage(e.Image, -1);
}
Lastly, I save the results from the OCR to disk. As you remember, I
set up the OCR to output the results as a PDF file. The OCR will take
the data in the recognition data file and convert it to a searchable
PDF file.
private void btnSave_Click(object sender, EventArgs e)
      {
         SaveFileDialog dlg = new SaveFileDialog();
         dlg.Filter = "PDF (*.pdf)|*.pdf";
         dlg.FilterIndex = 0;

         if (dlg.ShowDialog() == DialogResult.OK)
         {
            _OCR.SaveResultsToFile(dlg.FileName);
         }
      }