Creating the Gridview
First of all create a new project, type project C# NET Framework 3.0: Window Application (WPF).
Now add a ListView (not a ListBox), from "All Controls" section in toolbox, and change the Name to "DataList". You will have code like:
<Window x:Class="sample1.Window1"
    xmlns="http://schemas.microsoft.com/winfx/2006/xaml/presentation"
    xmlns:x="http://schemas.microsoft.com/winfx/2006/xaml"
    Title="sample1" Height="320" Width="500"
    >
    <Grid>
    <ListView Margin="0,0,0,50" Name="DataList" />
  </Grid>
</Window>
Take a look at the Window.g.cs code. If it is added, the internal DataList will be ok, if not add the next line:
internal System.Windows.Controls.ListView DataList;
You don't need to initialize it because it exists in the XAML section. Run the project to be sure all is working.
XML Databinding
Here I explain in the code explanation how to bind from XML using only XAML (static version) and then from XML with XAML and C# (my favourite way) because it is easier to change the source at runtime.
I will use in this section the next one called "data.xml" file:
 <Customers>
  <Customer>
 <Code>1234</Code>
 <Name>EPI</Name>
 <Country>Sesame Street</Country>
  </Customer>
  <Customer>
 <Code>3234</Code>
 <Name>Paul</Name>
 <Country>United Kingdom</Country>
  </Customer>
 <Customer>
 <Code>3344</Code>
 <Name>Juan</Name>
 <Country>Spain</Country>
  </Customer>
 <Customer>
 <Code>4321</Code>
 <Name>Dodo</Name>
 <Country>Mars</Country>
  </Customer>
</Customers>
Remember XML and .NET 2.0
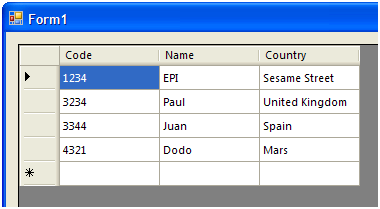
To bind XML data to a DataGridView in .NET 2.0, you have to add the following code:
string file = "data.xml";
DataSet ds = new DataSet("Table");
ds.ReadXml(file);
dG1.DataSource = ds.Tables[0].DefaultView;
You will now have a fast way to show data:
XML Binding Using Only XAML
In this case, first you have to create a new Window.Resource:
<Window.Resources>
    <XmlDataProvider x:Key="CustomersDS" Source="C:\data.xml"/>
</Window.Resources>
and now we have to change the listview to have a gridview aspect:
<ListView Margin="0,0,0,50" ItemTemplate="{DynamicResource CustomerTemplate}"
 ItemsSource="{Binding Source={StaticResource CustomersDS}, XPath=/Customers/Customer}">
      <ListView.View>
        <GridView>
          <GridViewColumn Header="Code" DisplayMemberBinding="{Binding XPath=Code}"/>
          <GridViewColumn Header="Name" DisplayMemberBinding="{Binding XPath=Name}"/>
          <GridViewColumn Header="Country"
		DisplayMemberBinding="{Binding XPath=Country}"/>
        </GridView>
      </ListView.View>
</ListView>
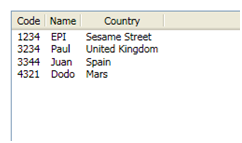
With this method, you will have a static XML binding using only XAML:
XML Binding Using XAML and C#
Generate the "data.xml" shown before, and (that's the way I like code), create the method OnLoad. To do that, add the "Loaded" event to the XAML <window> tag:
<Window x:Class="WindowsApplication7.Window1"
    xmlns="http://schemas.microsoft.com/winfx/2006/xaml/presentation"
    xmlns:x="http://schemas.microsoft.com/winfx/2006/xaml"
    ...
    Loaded="OnLoad"
>
And in the window1.xaml.cs, add the namespace using System.Data; and the method:
public void OnLoad(Object o, EventArgs e)
{
            string file = @"c:\data.xml";
            DataSet ds = new DataSet("Table");
            ds.ReadXml(file);
            List1.DataContext = ds.Tables[0].DefaultView;
}
Now you have to assign the link between "Table" and "BindingPath" in the XAML with the following code:
<Grid x:Name="LayoutRoot">
    <ListView Name="List1" Margin="35,34,212,123"
	ItemTemplate="{DynamicResource CustomerTemplate}"
	ItemsSource="{Binding Path=Table}">
      <ListView.View>
        <GridView>
          <GridViewColumn Header="Code" DisplayMemberBinding="{Binding Path=Code}"/>
          <GridViewColumn Header="Name" DisplayMemberBinding="{Binding Path=Name}"/>
          <GridViewColumn Header="Country" DisplayMemberBinding="{Binding Path=Country}"/>
        </GridView>
      </ListView.View>
    </ListView>
</Grid>
To understand better the link between XAML and C#, take a look at this diagram:
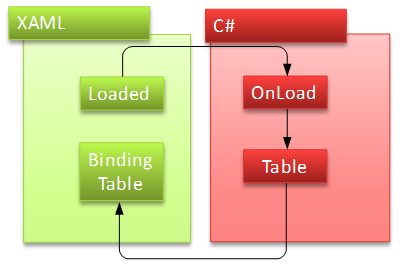
Loaded calls OnLoad that fills the table and paints on gridview. I like this method because you can easily change the datasource.
SQL Server Binding
Create a new database call "Customers" and create inside the table "customers" with this structure:
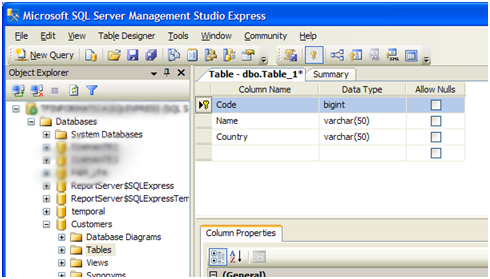
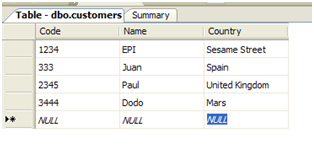
We add example data in the table:
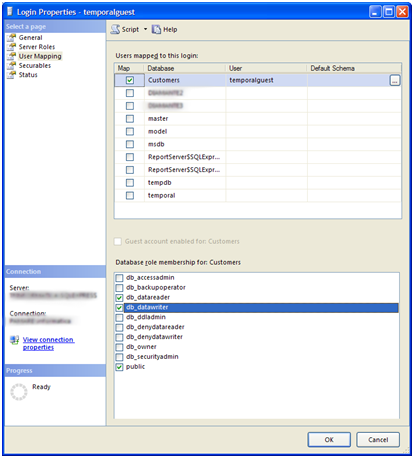
Remember that the user must have a role to access this database and activate datareader and datawriter:
Now add the namespace: using System.Data.SqlClient; and the modify the previous OnLoad method to have:
public void OnLoad(Object o, EventArgs e)
{
    string s_command = "SELECT Code,Name,Country FROM customers";
    SqlConnection connection = new SqlConnection();
    SqlDataAdapter adapter = new SqlDataAdapter();
    SqlCommand command = new SqlCommand();
    command.CommandText = s_command;
    adapter.SelectCommand = command;
    connection.ConnectionString = "Data Source=192.168.10.9,1433;
	Initial Catalog=Customers;Network Library=DBMSSOCN;
	User ID=temporalguest;Password='';";
    command.Connection = connection;
    DataSet ds = new DataSet();
    adapter.Fill(ds,"Table");
    List1.DataContext = ds.Tables[0].DefaultView;
    connection.Close();
}
NOTE: The SQL queries are not case sensitive, the XAML are CASE SENSITIVE so, the name of the columns have to be the same as the name of DisplayMemberBinding.
Access DataBinding
Open Access and create a new database called "customers.mdb" and add inside the table "customers" like the previous section.
Add the namespace using System.Data.OleDb; and simply modify the OnLoad method to the next:
public void OnLoad(Object o, EventArgs e)
{
   string s_command = "SELECT Code,Name,Country FROM customers";
   OleDbConnection connection = new OleDbConnection();
   OleDbDataAdapter adapter = new OleDbDataAdapter();
   OleDbCommand command = new OleDbCommand();
   command.CommandText = s_command;
   adapter.SelectCommand = command;
   connection.ConnectionString =
	@"Provider=Microsoft.Jet.OLEDB.4.0;Data source=C:\customers.mdb";
   connection.Open();
   command.Connection = connection;
   DataSet ds = new DataSet();
   adapter.Fill(ds);
   List1.DataContext = ds.Tables[0].DefaultView;
   connection.Close();
}
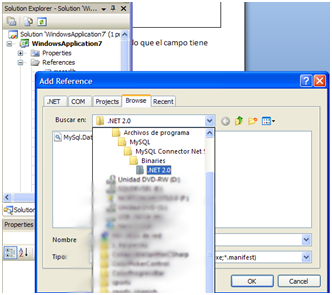
Taking care that we have correctly installed MySQLServer, simply add the namespace using MySql.Data.MySqlClient and change the OnLoad method to:
public void OnLoad(Object o, EventArgs e)
{
  string s_command = "SELECT Code,Name,Country FROM customers";
  MySqlConnection connection = new MySqlConnection();
  MySqlCommand command = new MySqlCommand();
  MySqlDataAdapter adapter = new MySqlDataAdapter();
  command.CommandText = s_command;
  adapter.SelectCommand = command;
  connection.ConnectionString = "Server=192.168.10.9;
	Database=Customers;User Id=temporalguest;Password=111111;";
  command.Connection = connection;
  DataSet ds = new DataSet();
  adapter.Fill(ds, "Table");
  List1.DataContext = ds.Tables[0].DefaultView;
  connection.Close();
}
Customizing the GridView
In this article, I show how to customize the main aspects of the gridview. This is a strange control in WPF because it is not accessible from Blend in design time, so here I explain how to customize it in XAML code.
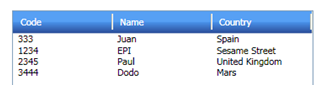
Customize the Header
If you want to customize the header of every column, add the following code in the Listview tag:
<GridView ColumnHeaderTemplate="{StaticResource BlueHeader}">
In case you want to customize per column, add the following code:
<GridViewColumn Header="Code" DisplayMemberBinding="{Binding Path=Code}"
	HeaderTemplate="{StaticResource BlueHeader}" />
Now simply add the resource in the <Window> tag:
<Window.Resources>
    <DataTemplate x:Key="BlueHeader">
      <StackPanel Orientation="Horizontal" Margin="-5,-5,-5,-5" Width="120">
        <StackPanel.Background>
          <LinearGradientBrush EndPoint="0.5,1" StartPoint="0.5,0">
            <GradientStop Color="#FF223B84" Offset="1"/>
            <GradientStop Color="#FF57A0F4" Offset="0.5"/>
            <GradientStop Color="#FF4B94EC" Offset="0.5"/>
          </LinearGradientBrush>
        </StackPanel.Background>
        <TextBlock Margin="10,10,10,10" Text="{Binding}"
		VerticalAlignment="Center"  Foreground="White"/>
        </StackPanel>
    </DataTemplate>
</Window.Resources>
Now we will have a gridview like:
Customize the Background
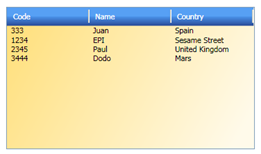
That's too easy, you can do it in Blend if you want. The code you need to add in the <ListView> tag is:
<ListView.Background>
        <LinearGradientBrush EndPoint="0.939,0.919" StartPoint="0.061,0.081">
          <GradientStop Color="#FFFFE07E" Offset="0"/>
          <GradientStop Color="#FFFFFAEA" Offset="1"/>
        </LinearGradientBrush>
</ListView.Background>
And then we will have:
Customize the Rows
First let's change the typical style of the rows. To do that, simply add the next XAML code in the <ListView> tag:
<ListView.ItemContainerStyle>
        <Style TargetType="{x:Type ListViewItem}"  >
          <Setter Property="Height" Value="24" />
          <Setter Property="Background" Value="#5EF4E057" />
          <Setter Property="Foreground" Value="#FF4B94EC"/>
        </Style>
</ListView.ItemContainerStyle>
Now add XAML code to change when the mouse is over. To do that, add an XAML style trigger, with the typical mouse over code you will have:
<ListView.ItemContainerStyle>
        <Style TargetType="{x:Type ListViewItem}"  >
          <Setter Property="Height" Value="24" />
          <Setter Property="Background" Value="#5EF4E057" />
          <Setter Property="Foreground" Value="#FF4B94EC"/>
          <Style.Triggers>
            <Trigger Property="IsMouseOver" Value="true">
              <Setter Property="Foreground" Value="DarkBlue" />
              <Setter Property="Background">
                <Setter.Value>
                  <LinearGradientBrush EndPoint="0.5,1" StartPoint="0.5,0">
                    <GradientStop Color="#FFFFC704" Offset="0.986"/>
                    <GradientStop Color="#FFF4E057" Offset="0.5"/>
                    <GradientStop Color="#FFF4E057" Offset="0.51"/>
                  </LinearGradientBrush>
                </Setter.Value>
              </Setter>
            </Trigger>
          </Style.Triggers>
        </Style>
</ListView.ItemContainerStyle>
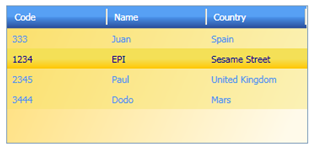
And finally, you will have a well styled gridview that was really hardcoded in previous versions of .NET: