-
Open the ZIP file containing your certificate. Save
the file named your_domain_name.cer to the desktop of the web server you
are securing.
-
Click on Start, then Administrative Tools, then Internet Information Services (IIS) Manager.
-
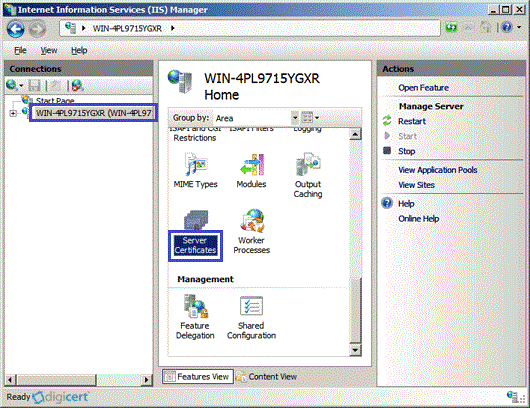
Click on the server name.
-
From the center menu, double-click the "Server
Certificates" button in the "Security" section (near the bottom of the
menu).
-
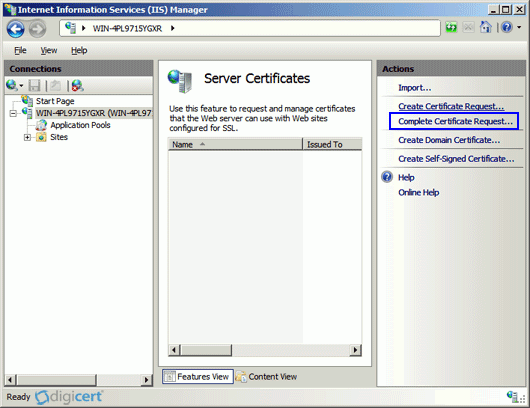
From the "Actions" menu (on the right), click on
"Complete Certificate Request." This will open the Complete Certificate
Request wizard.
-
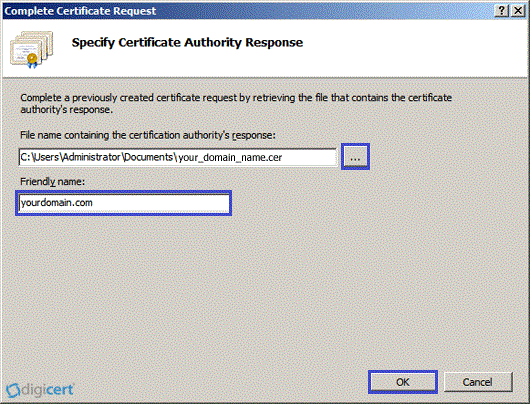
Browse to your_domain_name.cer file that was provided
to you by DigiCert. You will then be required to enter a friendly name.
The friendly name is not part of the certificate itself, but is used by
the server administrator to easily distinguish the certificate.
-
Clicking "OK" will install the certificate to the server.
Note:
There is a known issue in IIS 7 giving the following error: "Cannot
find the certificate request associated with this certificate file. A
certificate request must be completed on the computer where it was
created."
You may also receive a message stating "ASN1 bad tag value met".
If this is the same server that you generated the CSR on then, in
most cases, the certificate is actually installed.
Simply cancel the dialog and press "F5" to refresh the list of
server certificates.
If the new certificate is now in the list, you can continue with
the next step.
If it is not in the list, you will need to reissue your certificate
using a new CSR (see our CSR creation instructions for IIS 7). After creating a new CSR, login to your DigiCert account and click the re-key button for your certificate.
-
Once the SSL certificate has been successfully
installed to the server, you will need to assign that certificate to the
appropriate website using IIS.
-
From the "Connections" menu in the main Internet
Information Services (IIS) Manager window, select the name of the server
to which the certificate was installed.
-
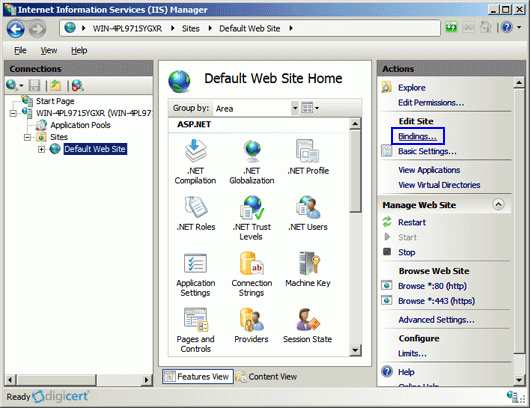
Under "Sites," select the site to be secured with SSL.
-
From the "Actions" menu (on the right), click on "Bindings." This will open the "Site Bindings" window.
-
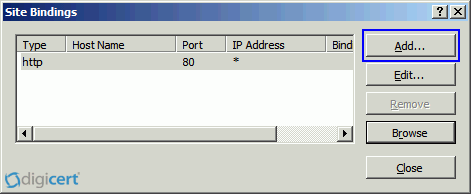
In the "Site Bindings" window, click "Add..." This will open the "Add Site Binding" window.
-
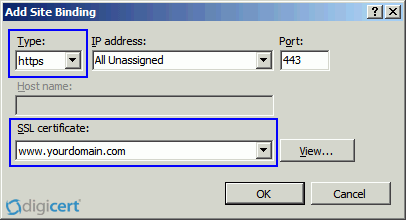
Under "Type" choose https. The IP address should be
the IP address of the site or All Unassigned, and the port over which
traffic will be secured by SSL is usually 443. The "SSL Certificate"
field should specify the certificate that was installed in step 7.
-
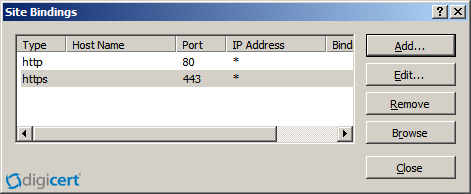
Click "OK."
-
Your SSL certificate is now installed, and the website configured to accept secure connections.
To enable your SSL certificate for use on other Windows servers, see our PFX export instructions for help.