Introduction
Here is the part two of the article where we will be developing three mobile client
application in iOS, Android and Windows Phone 8. You can read part one here and grab the source code from that article in Source Code section at last. We will
be using this source code now onwards.
Perquisites
• Visual Studio 2012
• Xamarin download
http://xamarin.com/download
Setup trial version
http://docs.xamarin.com/guides/cross-platform/getting_started/beginning_a_xamarin_trial/
• If you have Mac running Mountain Lion or later, follow this link to setup Xamarin
build host
http://docs.xamarin.com/guides/ios/getting_started/installation/windows/#Installation
• Part 1 source code. Download from here.
iOS app
Open XamarinWCF solution and add one new project of type HelloWorld Application under
iOS project. Name this project iOS. Now we will construct the UI in the code.
You can however design UI in Xcode designer. Have a look at this article to know more about it. As our UI is pretty simple, I decided to do it via
code. Open MyViewController.cs and replace all code with following.
using System;
using MonoTouch.UIKit;
using System.Drawing;
using ServiceAgent;
namespace iOS
{
public class MyViewController : UIViewController
{
UIButton sumButton;
UITextField txtValue1;
UITextField txtValue2;
UILabel lblValue1;
UILabel lblValue2;
UILabel lblSum;
public MyViewController()
{
}
public override void ViewDidLoad()
{
base.ViewDidLoad();
View.Frame = UIScreen.MainScreen.Bounds;
View.BackgroundColor = UIColor.White;
View.AutoresizingMask = UIViewAutoresizing.FlexibleWidth | UIViewAutoresizing.FlexibleHeight;
lblValue1 = new UILabel();
lblValue1.Text = "Value one";
lblValue1.Frame = new RectangleF(15f, 15f, View.Frame.Width - 20f, 30f);
lblValue1.AutoresizingMask = UIViewAutoresizing.FlexibleWidth | UIViewAutoresizing.FlexibleTopMargin
| UIViewAutoresizing.FlexibleBottomMargin;
txtValue1 = new UITextField();
txtValue1.Layer.BorderWidth = 1f;
txtValue1.Frame = new RectangleF(15f, 40f, View.Frame.Width - 40f, 30f);
txtValue1.AutoresizingMask = UIViewAutoresizing.FlexibleWidth | UIViewAutoresizing.FlexibleTopMargin
| UIViewAutoresizing.FlexibleBottomMargin;
lblValue2 = new UILabel();
lblValue2.Text = "Value two";
lblValue2.Frame = new RectangleF(15f, 65f, View.Frame.Width - 20f, 30f);
lblValue2.AutoresizingMask = UIViewAutoresizing.FlexibleWidth | UIViewAutoresizing.FlexibleTopMargin
| UIViewAutoresizing.FlexibleBottomMargin;
txtValue2 = new UITextField();
txtValue2.Layer.BorderWidth = 1f;
txtValue2.Frame = new RectangleF(15f, 90f, View.Frame.Width - 40f, 30f);
txtValue2.AutoresizingMask = UIViewAutoresizing.FlexibleWidth | UIViewAutoresizing.FlexibleTopMargin
| UIViewAutoresizing.FlexibleBottomMargin;
lblSum = new UILabel();
lblSum.Frame = new RectangleF(15f, 115f, View.Frame.Width - 40f, 30f);
lblSum.AutoresizingMask = UIViewAutoresizing.FlexibleWidth | UIViewAutoresizing.FlexibleTopMargin
| UIViewAutoresizing.FlexibleBottomMargin;
sumButton = UIButton.FromType(UIButtonType.RoundedRect);
sumButton.SetTitle("Do sum", UIControlState.Normal);
sumButton.Layer.BorderWidth = 1f;
sumButton.Frame = new RectangleF(15f, 140f, View.Frame.Width - 40f, 30f);
sumButton.AutoresizingMask = UIViewAutoresizing.FlexibleWidth | UIViewAutoresizing.FlexibleTopMargin
| UIViewAutoresizing.FlexibleBottomMargin;
View.AddSubview(lblValue1);
View.AddSubview(txtValue1);
View.AddSubview(lblValue2);
View.AddSubview(txtValue2);
View.AddSubview(lblSum);
View.AddSubview(sumButton);
}
}
}
Listing 1.0 – UI generation code for iOS app
As per Listing 1.0, we have created couple of UILabel and UITextField along with
UIButton. View.AddSubView adds these controls in current view so it can be displayed
when application runs.
Adding references for CalculatorService
Now let's call our CalculatorService that we created in Part 1 of this article.
For that, just add reference to ServiceAgent project. Also we need to add references
to System.Runtime.Serialization, System.ServiceModel, and System.ServiceModel.Web.
Adding these references will be common for all three mobile applications.
With all these done, let's add the following code just above View.AddSubview(lblValue1);
line.
sumButton.TouchUpInside += async (object sender, EventArgs e) =>
{
var task = CalculatorServiceAgent.DoSum(Convert.ToInt32(txtValue1.Text), Convert.ToInt32(txtValue2.Text));
int res = await task;
lblSum.Text = String.Format("Sum is {0}", res.ToString());
};
Listing 1.1 – iOS app calling WCF service through agent
Here as per Listing 1.1, the call to DoSum method on agent returns Tast<int>
object. It is asynchronous operations so I need to use await for the task. Once
it executes, it shows the result in lblSum. Now go ahead and Press F5. I assume
that you have setup networked Mac machine for build running Xamarin build host.
If not, please go through the links in Perquisites section at the beginning of
this article.

Figure 1.0 – Xamarin iOS app consuming WCF service
Figure 1.0 shows our iOS app in action. I just put two values and hit Do sum button
and result is displayed just above the button. It is just cool to develop iOS
app in C#!
Android app
Let's quickly build Android app. Add new project of type Android Application
to XamarinWCF solution and name it Android. In an android project, the default
view is defined in Main.axml file located in Resources\Layout folder.
To create view, you can use Android designer in Visual studio or can directly construct
using markup. For our application, the complete xml markup is as following for
Main.axml file.
<?xml version="1.0" encoding="utf-8"?>
<LinearLayout xmlns:android="http://schemas.android.com/apk/res/android"
android:orientation="vertical"
android:layout_width="fill_parent"
android:layout_height="fill_parent">
<TextView
android:text="Value one"
android:textAppearance="?android:attr/textAppearanceMedium"
android:layout_width="match_parent"
android:layout_height="wrap_content"
android:id="@+id/textView1" />
<EditText
android:inputType="number"
android:layout_width="match_parent"
android:layout_height="wrap_content"
android:id="@+id/txtValue1" />
<TextView
android:text="Value two"
android:textAppearance="?android:attr/textAppearanceMedium"
android:layout_width="match_parent"
android:layout_height="wrap_content"
android:id="@+id/textView2" />
<EditText
android:inputType="number"
android:layout_width="match_parent"
android:layout_height="wrap_content"
android:id="@+id/txtValue2" />
<TextView
android:text=""
android:textAppearance="?android:attr/textAppearanceMedium"
android:layout_width="match_parent"
android:layout_height="wrap_content"
android:id="@+id/txtSumView" />
<Button
android:text="Do sum"
android:layout_width="match_parent"
android:layout_height="wrap_content"
android:id="@+id/SumButton" />
</LinearLayout>
Listing 1.2 – Android app markup for Main.axml
The markup in Listing 1.2 is pretty self-explanatory as we are setting text and layout
properties like height & width for the controls. Now the code for talking
to service will be placed in Activity1.cs file. But before that, complete steps
mentioned in section Adding references for CalculatorService above. Once you
are done with it, just write following code for Activity1.cs.
using Android.App;
using Android.OS;
using Android.Widget;
using ServiceAgent;
using System;
namespace Android
{
[Activity(Label = "Android", MainLauncher = true, Icon = "@drawable/icon")]
public class Activity1 : Activity
{
protected override void OnCreate(Bundle bundle)
{
base.OnCreate(bundle);
// Set our view from the "main" layout resource
SetContentView(Resource.Layout.Main);
// Get our button from the layout resource,
// and attach an event to it
Button SumButton = FindViewById<Button>(Resource.Id.SumButton);
SumButton.Click += SumButton_Click;
}
async void SumButton_Click(object sender, EventArgs e)
{
var txtValue1 = FindViewById<EditText>(Resource.Id.txtValue1);
var txtValue2 = FindViewById<EditText>(Resource.Id.txtValue2);
var txtSumView = FindViewById<TextView>(Resource.Id.txtSumView);
var task = CalculatorServiceAgent.DoSum(Convert.ToInt32(txtValue1.Text), Convert.ToInt32(txtValue2.Text));
var res = await task;
txtSumView.Text = string.Format("Sum is {0}", res.ToString());
}
}
}
Listing 1.3 – Android app calling WCF service through agent
Here as per Listing 1.3, the caller part to WCF service via agent is same as what
we wrote for iOS app. At this point, you are all set to hit F5 and see Android
app in action as Figure 1.1.
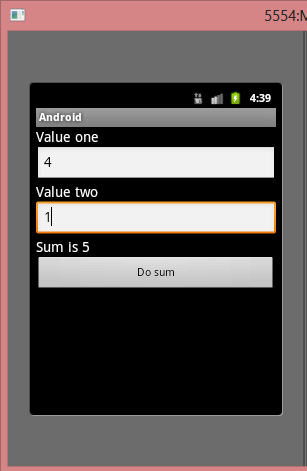
Figure 1.1 – Xamarin Android app consuming WCF service
Windows Phone 8 app
For windows phone app, add project of type Windows Phone App to XamarinWCF solution
and name it WP8. Then replace the entire markup for default Grid in MainPage.xaml
page with the following:
<!--LayoutRoot is the root grid where all page content is placed-->
<Grid x:Name="LayoutRoot" Background="Transparent">
<Grid.RowDefinitions>
<RowDefinition Height="Auto"/>
<RowDefinition Height="Auto"/>
<RowDefinition Height="Auto"/>
<RowDefinition Height="Auto"/>
<RowDefinition Height="Auto"/>
<RowDefinition Height="Auto"/>
</Grid.RowDefinitions>
<TextBlock HorizontalAlignment="Left" TextWrapping="Wrap" Text="Value one" VerticalAlignment="Top" Grid.Row="0"/>
<TextBox x:Name="txtValue1" HorizontalAlignment="Stretch" Height="72" VerticalAlignment="Top" Grid.Row="1"/>
<TextBlock HorizontalAlignment="Left" TextWrapping="Wrap" Text="Value two" VerticalAlignment="Top" Grid.Row="2"/>
<TextBox x:Name="txtValue2" HorizontalAlignment="Stretch" Height="72" VerticalAlignment="Top" Grid.Row="3"/>
<TextBlock x:Name="txtSum" HorizontalAlignment="Left" VerticalAlignment="Top" Grid.Row="4"/>
<Button x:Name="sumButton" Content="Do sum" HorizontalAlignment="Stretch" VerticalAlignment="Top" Grid.Row="5" Click="sumButton_Click" />
</Grid>
Listing 1.4 – Windows phone app UI markup for MainPage.xaml
Now it's time to call service. Just add reference to ServiceAgent project and
write following piece of code in MainPage.xaml.cs
private async void sumButton_Click(object sender, RoutedEventArgs e)
{
var task = CalculatorServiceAgent.DoSum(Convert.ToInt32(txtValue1.Text), Convert.ToInt32(txtValue2.Text));
var res = await task;
txtSum.Text = string.Format("Sum is {0}", res.ToString());
}
Listing 1.5 – Windows phone calling WCF service through agent
Now you are all set to hit F5 and run the application. I have Nokia Lumia 720 so
I connected that to test the app.
Following is the screenshot of the app running on my phone.

Figure 1.2 – Windows phone 8 app consuming WCF service on Nokia Lumia 720
I hope you enjoyed this article so much as I while writing!
Source Code
Download source code here.